 When I upgraded my FreeNAS server from 9.10.1-U4 I lost my VirtualBox VMs. I’d managed to recreate the ubuntu and FreeNAS ones using iohyve/bhyve, but hadn’t managed to replace the Windows VM on FreeNAS, until today!
This is something I’ve been wanting to do for some time, but from the various threads I’d skimmed over, I thought for some reason that it was going to be too difficult. Had I know what I’m going to tell you below, I’d have done this much sooner.
The issue I’d always faced when trying to create a Windows VM in FreeNAS, either from the CLI using iohyvecommand or more recently from the GUI since upgrading to 11.1-U4, was the UEFI Shell screen.
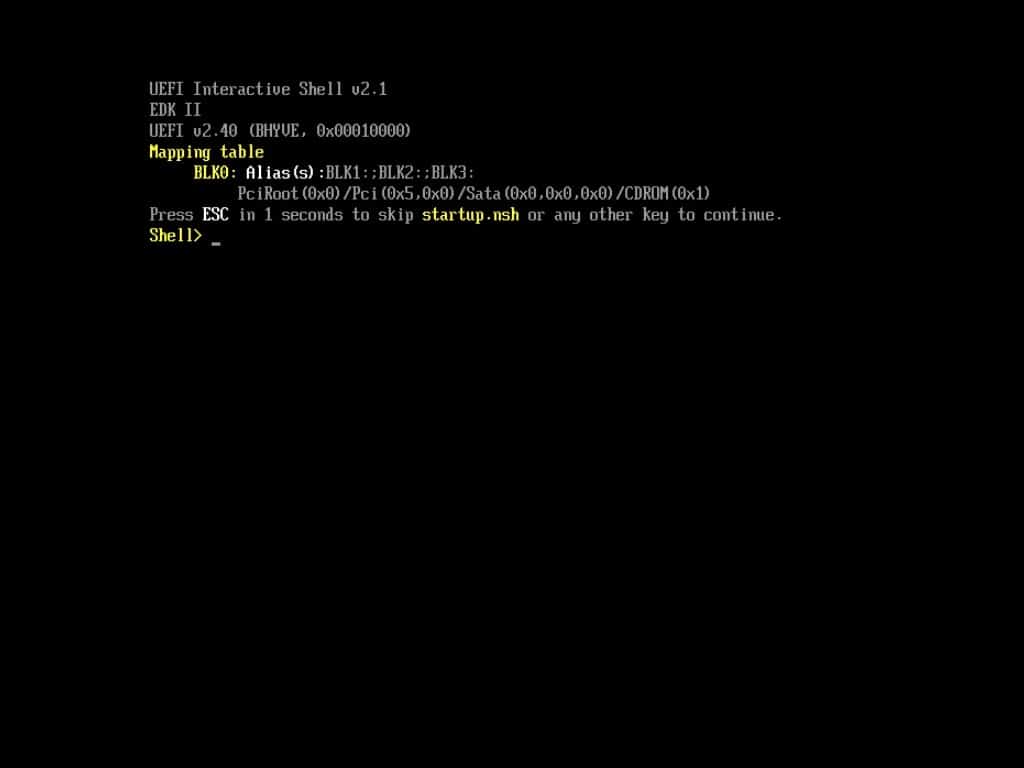
Little did I know that typing ‘exit’ and then hitting Enter brings up another screen.
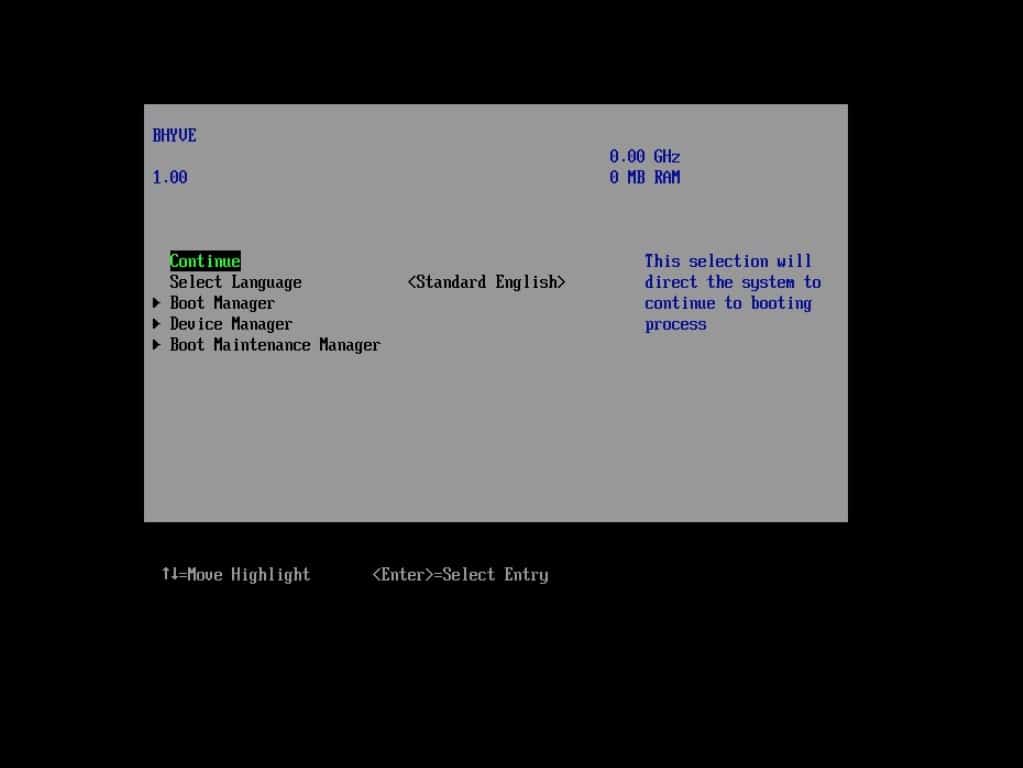
Pressing Enter on this screen brings up the screen I was expecting to see, and pressing any key starts the Windows boot process.

Yes, really that simple!
I used my Windows 10 VM on VirtualBox for running a Glassfish/Java application on a Microsoft SQL database that I’d helped to develop and support when working for BT.
I’d been speaking with someone about it recently and wanted to show them, but it wasn’t very easy to do on my MacBook, as I needed another VM. The Corporate Procurement Analysis System, or CPAS for short, has been written to make use a quite a large amount of RAM (back in 2009) and struggled with anything less than 8GB.
Given my MacBook only has 8GB, which would be needed to run macOS and then virtualise Windows, before even getting to CPAS it was never a very good platform for demonstrating. Creating a VM on my FreeNAS server allows me to provision plenty of RAM and CPU, and I can demonstrate much more like it would ultimately be deployed, in a client-server model.
Anyway, it took a couple of failed attempts before I finally got everything running as I’d like.
Take 1 I’d tried to use Windows 10, and remember having problems with some of the older java packages so eventually gave up.
Take 2 I thought I’d use Windows Server 2012 R2 (which is what we’d used at a couple of sites for BT) and I got everything installed and working without too many problems, although the VM itself was very unstable and crashed far to frequently to be used even for testing.
For Take 3 I used Windows Server 2016 and everything worked perfectly!
The only bit I still haven’t worked out it how to access externally through my NGINX Reverse Proxy, as I’m just getting a 403 error with the various things I’ve tried. For the time being, I’ve just opened and forwarded a random port on my router straight to the jail IP.
Anyway, if you stumble upon this struggling how to create a Windows VM in FreeNAS, I hope the simple steps above help you on your way…
Trackbacks/Pingbacks