
Although I might still try and get my old crashplan VM running on FreeNAS0, I always had it in my mind that I’d virtualise main use cases – ONLYOFFICE Document Service, Crashplan and Docker – on Ubuntu 18.04 on FreeNAS0.
Creating the Virtual Machine(s)
Creating the VM in FreeNAS is pretty straight forward from the WUI, and then going through the standard Ubuntu installation process. Nothing fancy, just a server install with pretty much the default options plus SSH. You can then VNC into the server from the FreeNAS WUI.
My first task was to set a root password, as it just makes it easier to install everything. Otherwise, I just forget to type sudo on every line! That’s as simple as sudo passwd root and then entering a UNIX password. Test it with su root and the password. I’m going to set it so that I can SSH using root with the following:
sudo sed -i 's/#PermitRootLogin prohibit-password/PermitRootLogin yes/' /etc/ssh/sshd_config
sudo service ssh restart
I’m also going to be connecting to several NFS shares so need to install the NFS package apt install nfs-common and then add mount points into nano /etc/fstab which look something like this:
192.168.n.n:/mnt/APEpool0/temp /mnt/temp nfs nfsvers=3
ONLYOFFICE
I blogged about getting ONLYOFFICE up and running in a VM here (I knew this blog would start to come in handy!) and the main thing you need to install ONLYOFFICE in a VM is here.
It still works pretty well, and is mainly just a case of copying and pasting the lines into a terminal SSH session. Don’t try and be clever by changing the username or password, as it won’t work! It does warn you, but sometimes it’s easy to skip past the instructions and get carried away copy & pasting!! It also didn’t like installing npm but this can be updated later.
Once it was up and running, I updated the nodejs which includes npm
curl -sL https://deb.nodesource.com/setup_9.x | sudo bash -sudo apt-get install -y nodejssudo apt-get install onlyoffice-documentserver
After that, you can also rebuild the spellchecker as described, but if you get a permission issue with npm, you might need to read this.
Because I’m using this with an SSL secured Nextcloud, I also need to switch this to HTTPS, as described here. All my certificates are managed in a jail, so I’ve mounted that into this VM and then configured the .conf file restarting NGINX. I think I’m going to leave that running in its own VM for now, and have different VMs for different things, rather than 1 doing everything.
CrashPlan
I found this which describes installing a light-weight desktop on Ubuntu server, as sometimes it’s just easier to see what’s happening. It’s certainly much easier to install and configure CrashPlan with it.
I ended up going for the Lubuntu Core Server Desktop, and installation was as simple as the guide. It is very light, so much so it doesn’t even install a web browser!
I copied across all of the mounts from /etc/fstab on FreeNAS1, and configured them for the shares on FreeNAS0. All good apart from my poor typing skills which stopped a couple from starting to begin with!
Installing CrashPlan and configuring it is pretty simple, but the terminology they use is pretty confusing! This explains how to log into the CrashPlan service and then this explains how to replace a device, although these are the steps I took:
apt install firefox- Logged into CrashPlan and downloaded latest Linux version
- Uncompressed with
tar -zxvf <downloaded_file_name> cd ./crashplan-install./install.sh- Installed with default options
- Started CrashPlan App
- Select Replace Device
- Select the old Device (in my case crashplan.bhyve)
- Skip file transfer (all the mounts have these files, and they don’t need downloading)
- Transfer configuration and restart the App
- When it starts back up, it should begin a synchronisation
And that’s pretty much it. I’ll check some things once that’s all done, as there may be a few differences around the LimeSurvey/survey jails, but generally, everything should be pretty much as it was.
Docker
I thought I’d check out the Docker option built into the FreeNAS VM setup, but I’ve played with RancherOS before and it just confused me. Even after some time playing around with Docker and Portainer, it still makes little sense, so it’s another ubuntu VM with docker and Portainer configured.
I found the Docker install guide here and then here for Portainer which gets the basics up and running. Getting my docker containers running is for another blog, although again I managed to get this done and written today here!
The only gotcha here was that the Portainer container didn’t automatically start, which maybe I should have included in the build instruction:
docker run -d -p 8000:8000 -p 9000:9000 -v /var/run/docker.sock:/var/run/docker.sock -v /mnt/docker/portainer:/data portainer/portainer
docker update --restart=always 0576df221c0b (where the last bit is the container ID once it’s running) fixed that.
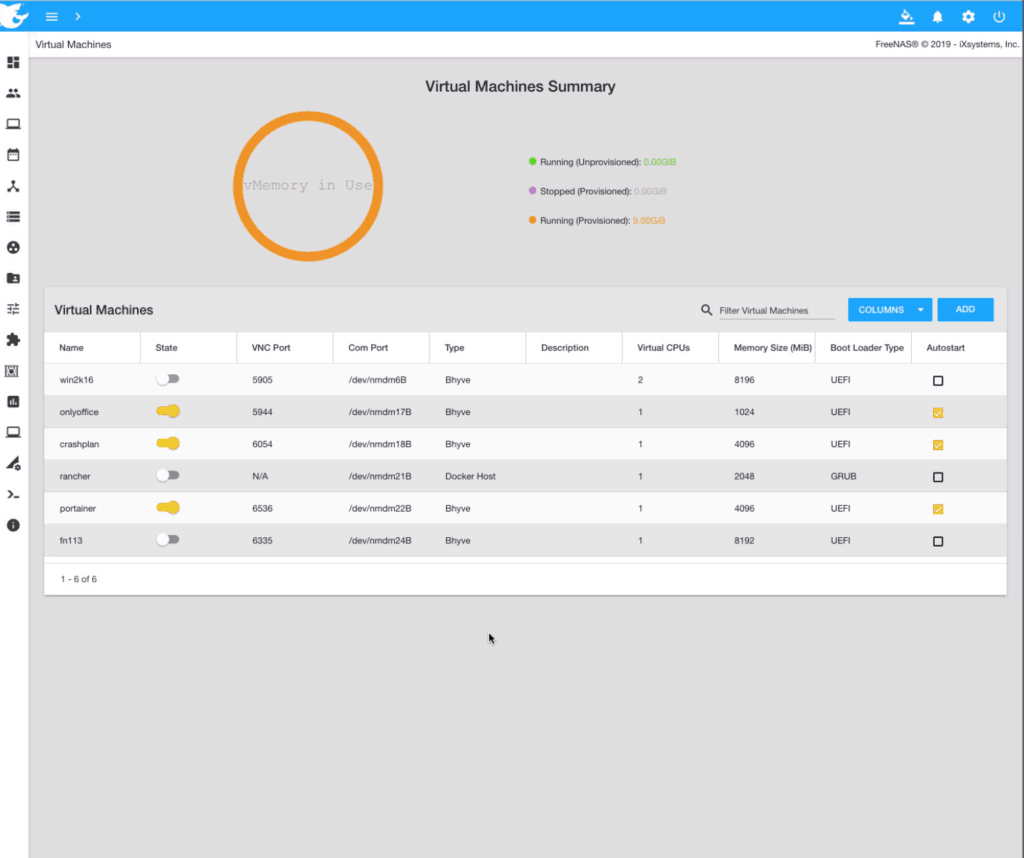
So, where does that leave me?
- win2k16 – a Windows 2016 Server for running CPAS (MS SQL and Glassfish) – only fired up when needed
- onlyoffice – a Ubuntu 18.4 Server running ONLYOFFICE Document Server 24×7
- crashplan – another Ubuntu 18.4 Server running a Lubuntu Server Desktop and CrashPlan 24×7
- rancher – a RancherOS VM which I might come back to try and understand at some point, but for now switched off
- portainer – another Ubuntu 18.4 Server VM running Docker and Portainer 24×7 (see blog about containers here)
- fn113 – a FreeNAS 11.3-RC1 VM for testing the latest test releases which I fire up as required
This proved handy when I rebuilt the crashplan VM as the old one kept shutting itself down. Never got to the bottom of it, so created a new VM running ubuntu desktop 18.04